Simulating an ALU in F#
I’m a rank beginner with F#, and I was looking for a fun way to get started. The usual tutorials seemed a little stale. Then it occurred to me that logic gates could be modeled as functions pretty easily. Why not practice F# by writing some functions that mimic the behavior of logic gates?
Project setup
The first step is to set up the project. After creating a root directory for it, I set up a .NET project as follows. This was done on a Mac running OS X, so the commands are Unix-style, not Windows-style, even though it’s a .NET project.
cd alu-simulator
dotnet new sln
mkdir AluSimulator
cd AluSimulator
dotnet new classlib -lang F#
cd ..
mkdir AluSimulator.Tests
cd AluSimulator.Tests
dotnet new xunit -lang F#
dotnet add reference ../AluSimulator/AluSimulator.fsproj
cd ..
dotnet sln add AluSimulator/AluSimulator.fsproj
dotnet sln add AluSimulator.Tests/AluSimulator.Tests.fsproj
The dotnet tooling generates a test module with a single test case that verifies “true” is equal to “true”. Before making any changes to the generated artifacts, I executed the test:
cd AluSimulator.Tests
dotnet test
The result was:
Starting test execution, please wait...
[xUnit.net 00:00:00.7848420]   Discovering: AluSimulator.Tests
[xUnit.net 00:00:00.8971050]   Discovered:  AluSimulator.Tests
[xUnit.net 00:00:00.9605580]   Starting:    AluSimulator.Tests
[xUnit.net 00:00:01.1406990]   Finished:    AluSimulator.Tests

Total tests: 1. Passed: 1. Failed: 0. Skipped: 0.
Test Run Successful.
Test execution time: 2.2101 Seconds
You might wonder why anyone would bother running a test case like that. When you have a new setup for a greenfield project, the first thing you want to do is make sure the tools are configured properly. If that trivial test case had not run, it would mean I’d made a mistake in setting up the project.
We don’t want to lay down a lot of code only to have a problem, and not be able to see the cause immediately. So, we check everything as we go along, in very small steps.
NAND gate
Where shall we begin? Do we need a comprehensive up-front design? I don’t think so, in this case. The construction of logical units out of logic gates is a solved problem. All we have to do is look up some documentation and examples.
We’ve all had a little exposure to basic computer science, either through school or experience or general interest, so we know all the various Boolean logical operations can be built as simple circuits known as “gates.” Each type of gate is named for the logical operation it implements, such as AND and XOR and so forth.
We may or may not remember (but can find out quickly enough) that the NAND and NOR gates are the universal gates, because all the others can be built using one of these as building blocks. Of the two, NAND is the simpler. So, let’s begin our exploration of F# by writing a function that simulates a NAND gate. Wikipedia happens to have a nice writeup about NAND gates and another description of NAND logic we can use as guides.
Of course, we want to test-drive our code. That goes without saying. (Yes, I know; I said it anyway.)
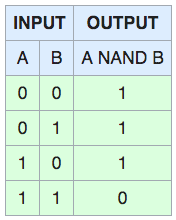
Here’s the MIL/ANSI symbol for a NAND gate:

It has two inputs and one output. According to our documentation, when both inputs are true, the output is false. Otherwise, the output is true. Here’s a truth table from Wikipedia showing this behavior:
From this, we know the behavior we want our function to exhibit, and we can write microtest cases to assert that behavior. Those microtests will help us write the appropriate code.
At this point I wasn’t sure whether it made more sense to use true/false or 1/0 for the values. I chose to start with true/false and see how things went. When we start combining our “gates” we might decide to change this.
This is one of the handy things about test-driven development: Because we work in very small steps and we can always tell when something isn’t working as expected, it’s relatively easy to change gears when it becomes necessary.
I removed the generated test case and added a reference to the AluSimulator project, and wrote this initial test case:
namespace AluSimulator.Tests

module Tests =

    open System
    open Xunit
    open AluSimulator

    []
    let ``nand outputs true when input A is false and input B is false`` () =
        Assert.True(ALU.nand false false)
The result was:
Build started, please wait...
/Users/neopragma/.../alu-simulator/AluSimulator.Tests/Tests.fs(9,18):
  error FS0039: The value or constructor 'nand' is not defined.
  Maybe you want one of the following:
    nan   nanf [/Users/neopragma/.../alu-simulator/AluSimulator.Tests/AluSimulator.Tests.fsproj]
/Users/neopragma/Documents/projects/alu-simulator/AluSimulator.Tests/Tests.fs(9,5):
  error FS0041: A unique overload for method 'False' could not be determined based on type information
  prior to this program point. A type annotation may be needed. Candidates:
    Assert.False(condition: Nullable<bool>) : unit,
    Assert.False(condition: bool) : unit
  [/Users/neopragma/.../alu-simulator/AluSimulator.Tests/AluSimulator.Tests.fsproj]
I could tell two things from this output. First, it appears that the initial test case failed for “the right reason,” as I haven’t written a function named nand yet. Second, I think I’m going to like the helpful error messages generated from this tool.
But after I defined the nand function, the test runner still did not seem to be able to find it. Eventually I saw that the file AluSimulator.fsproj contained the following specification:
  <ItemGroup>
    <Compile Include="Library.fs" />
  </ItemGroup>
I had written my code in a file named ALU.fs. The file Library.fs was a boilerplate sample file generated by the dotnet tooling. After changing the specification to this:
  <ItemGroup>
    <Compile Include="ALU.fs" />
  </ItemGroup>
the test case ran successfully. I fleshed out the remaining behaviors, and had my first simulated logic gate!
The microtests:
namespace AluSimulator.Tests

module Tests =

    open Xunit
    open AluSimulator

    [<Fact>]
    let ``nandGate outputs true when input A is false and input B is false`` () =
        Assert.True(ALU.nandGate false false)

    [<Fact>]
    let ``nandGate outputs true when input A is true and input B is false`` () =
        Assert.True(ALU.nandGate true false)

    [<Fact>]
    let ``nandGate outputs true when input A is false and input B is true`` () =
        Assert.True(ALU.nandGate false true)

    [<Fact>]
    let ``nandGate outputs false when input A is true and input B is true`` () =
        Assert.False(ALU.nandGate true true)
The production code:
namespace AluSimulator

module ALU =

    let nandGate a b = not (a && b)
The test run:
Starting test execution, please wait...
[xUnit.net 00:00:00.8010060]   Discovering: AluSimulator.Tests
[xUnit.net 00:00:00.9126970]   Discovered:  AluSimulator.Tests
[xUnit.net 00:00:00.9685550]   Starting:    AluSimulator.Tests
[xUnit.net 00:00:01.1716740]   Finished:    AluSimulator.Tests

Total tests: 4. Passed: 4. Failed: 0. Skipped: 0.
Test Run Successful.
Test execution time: 2.4115 Seconds
NOT gate
Well, I’m excited now. I just test-drove my very first F# function. What’s next? I’m thinking a NOT gate. What do you think? Yeah? Okay, cool. NOT gate, it is.
It would be pretty simple to write a function to mimic the behavior of a NOT gate. It might look something like this:
let notGate a = not a
But that’s not the game. We’re building an ALU simulator. If we were building an ALU in hardware, we’d most likely make all the logic gates out of NAND gates, like this project and many others like it.
Here’s a representative example of the kind of hardware component we’re talking about: A single two-input NAND gate from Texas Instruments. There are many other products like this. All the other logic gates can be constructed by wiring these together in different ways.
I think it would be fun to duplicate that process in software.
Consulting the official Wikipedia documentation, we learn this is how to make a NOT gate out of NAND building blocks:

From that, we can see the behavior we want the NOT gate to exhibit. Let’s express that behavior in the form of microtests:
    [<Fact>]
    let ``notGate outputs false when input A is true`` () =
        Assert.False(ALU.notGate true)

    [<Fact>]
    let ``notGate outputs true when input A is false`` () =
        Assert.True(ALU.notGate false)
Okay, you’re right. My bad. It’s not good TDD form to write two failing tests before writing any code. It’s supposed to be one at a time. I’m skipping ahead a bit in the interest of space. It’s only a blog post, you know.
Anyway, long story short, the tests failed for the right reason, and I wrote the following code to make them pass:
let notGate a = nandGate a a
That code is nothing more than the picture from the Wikipedia article written as text.
AND gate
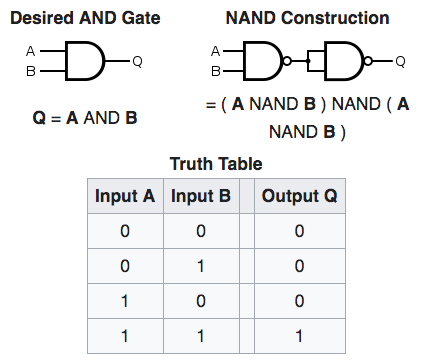
Don’t worry, I’m not going to step through every single gate function in excruciating detail. We’ve established the pattern we’ll follow to code all the remaining logic gates. But the AND gate is an interesting case. If we were doing a pure software thing, the andGate function would be pretty simple:
let andGate a b = a && b
But to build this out of NAND gates, it looks like this:
Driving from these microtest cases:
    [<Fact>]
    let ``andGate outputs true when input A is true and input B is true`` () =
        Assert.True(ALU.andGate true true)

    [<Fact>]
    let ``andGate outputs false when input A is true and input B is false`` () =
        Assert.False(ALU.andGate true false)

    [<Fact>]
    let ``andGate outputs false when input A is false and input B is true`` () =
        Assert.False(ALU.andGate false true)

    [<Fact>]
    let ``andGate outputs false when input A is false and input B is false`` () =
        Assert.False(ALU.andGate false false)
I came up with the following implementation:
let andGate a b = nandGate (nandGate a b) (nandGate a b)
To a software person, that loooks pretty convoluted. If we were building this in hardware, it would make a lot of sense to build it this way.
Better test cases?
At this point, something is starting to happen that often happens when we use a test-driven approach to development. We’ve accumulated several microtest cases that look very similar to one another. We’re starting to wonder whether we can simplify the tests.
So far, we’ve been writing example-based cases. When the code under test handles various combinations of inputs in a consistent way to produce deterministic results, it’s often helpful to write data-driven cases. Here’s how the examples for the addGate function can be re-cast as data-driven cases:
    [<Theory>]
    [<InlineData(true, true, true)>]
    [<InlineData(true, false, false)>]
    [<InlineData(false, true, false)>]
    [<InlineData(false, false, false)>]
    let ``andGate implements AND logic`` a b q =
        Assert.Equal(q, ALU.andGate a b)
At this point, I went back and changed the example-based cases to data-driven cases. I think it made for a simpler pattern to follow when building the remaining logic gate functions.
Half Adder
If we can make an ALU out of NAND gates, then what’s the point of building all the other types of logic gates? Maybe not much, for purposes of this exercise. Let’s go ahead and make something out of our NAND gates.
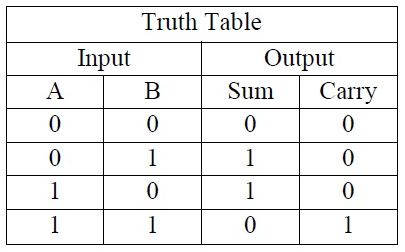
A half adder is a circuit that performs binary addition of two bits. There’s a nice write-up on Electronics Hub that explains various ways to combine logic gates to build a half adder, and how to make a full adder by combining two half adders.
A half adder takes two input bits, A and B, and produces two output bits, the Sum and the Carry bit. We can model that behavior in software with a function that takes two boolean arguments and produces a tuple containing two boolean values. We can summarize the behavior in a truth table (this image borrowed from the Electronics Hub article cited above):
We can express that behavior in Xunit test cases as follows:
    [<Theory>]
    [<InlineData(false, false, false, false)>]
    [<InlineData(false, true, true, false)>]
    [<InlineData(true, false, true, false)>]
    [<InlineData(true, true, false, true)>]
    let ``halfAdder adds two bits to produce a sum and carry bit`` a b (sum, carry) =
        let result = ALU.halfAdder a b
        Assert.Equal(sum, fst result)
        Assert.Equal(carry, snd result)
where the first two values are the input bits, the third value is the sum, and the fourth value is the carry bit.
You need five NAND gates to build a half adder, and my implementation code mirrors that in a naive way.
    let halfAdder a b =
        let u1 = nandGate a b
        let u3 = nandGate a u1
        let u4 = nandGate b u1
        let sum = nandGate u3 u4
        let carry = nandGate u1 u1
        sum, carry
I suspect someone who had more than 90 minutes experience with F# could do the same thing in a more concise and idiomatic way. As for me: I was happy to get to green. Simple pleasures, and all that.
Full Adder
A half adder only works for single-digit binary numbers. To handle longer numbers, we need to consider the carry bit resulting from the addition of each bit in the number. That’s what a full adder does. It takes three inputs: A, B, and the carry bit from the previous operation. It produces two outputs: The sum and the carry bit. You need one of these for each bit in your architecture; so, for an 8-bit architecture, you need eight full adders.
There’s more than one way to build a full adder. Let’s stick with our plan to make everything out of NAND gates. Here’s the truth table for a full adder. Thanks again to the Electronics Hub article for the image.
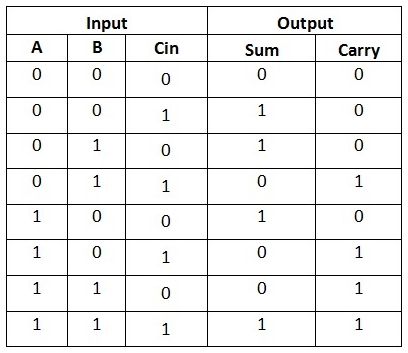
The truth table lays out the behavior that we want to see from our full adder function. Let’s express that behavior as an Xunit test case.
    [<Theory>]
    [<InlineData(false, false, false, false, false)>]
    [<InlineData(false, false, true, true, false)>]
    [<InlineData(false, true, false, true, false)>]
    [<InlineData(false, true, true, false, true)>]
    [<InlineData(true, false, false, true, false)>]
    [<InlineData(true, false, true, false, true)>]
    [<InlineData(true, true, false, false, true)>]
    [<InlineData(true, true, true, true, true)>]
    let ``fullAdder adds two bits and considers the previous carry bit`` a b c (sum, carry) =
        let result = ALU.fullAdder a b c
        Assert.Equal(sum, fst result)
        Assert.Equal(carry, snd result)
Building this naively based on the block diagram in the article, we have the following implementation:
    let fullAdder a b c =
        let u1 = nandGate a b
        let u3 = nandGate a u1
        let u4 = nandGate b u1
        let sum1 = nandGate u3 u4
        let u5 = nandGate sum1 c
        let u6 = nandGate sum1 u5
        let u7 = nandGate u5 c
        let sum = nandGate u6 u7
        let carry = nandGate u1 u5
        sum, carry
Full Adder with OR Gate
Now we have a half adder and a full adder, all made from NAND gates. But we could make a full adder by connecting two half adders, if we had an OR gate. Let’s test-drive an OR gate function and try that approach.
This Wikipedia article shows how to make an OR gate from NAND gates:
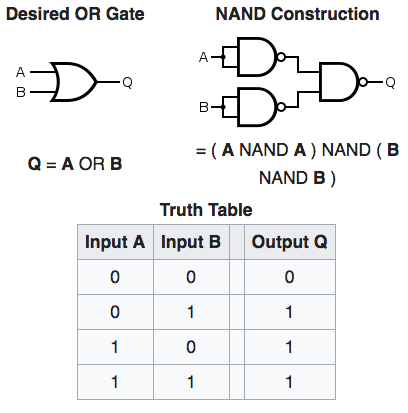
That leads us to this test case:
    [<Theory>]
    [<InlineData(false, false, false)>]
    [<InlineData(true, false, true)>]
    [<InlineData(false, true, true)>]
    [<InlineData(true, true, true)>]
    let ``orGate implements OR logic`` a b q =
        Assert.Equal(q, ALU.orGate a b)
Implementing the OR gate with NAND gates looks like this:
let orGate a b = nandGate (nandGate a a) (nandGate b b)
Now armed with an OR gate, we can wire two half adders together to make a full adder, as described here:
    let fullAdder a b c =
        let result1 = halfAdder a b
        let sum1 = fst result1
        let carry1 = snd result1
        let result2 = halfAdder sum1 c
        let carry2 = snd result2
        let carry = orGate carry1 carry2
        let sum = fst result2
        sum, carry
That implementation is slightly simpler and cleaner than the first, although still pretty naive. A good F# programmer could do better. Anyway, I enjoyed getting my feet wet with these tools.
Not much of an ALU
Fortunately, there isn’t really a hard-and-fast definition of what functionality must be present before we can call something an ALU. We can declare victory at this point, for immediate purposes.
We’ve written code that mimics the behavior of a very basic ALU built entirely of NAND gates. We’ve done:
- Half Adder
- Full Adder
I leave it as an exercise for the reader to build one of these…if you dare.

By the way, here’s the code, in case you’re interested: https://github.com/neopragma/alu-simulator.